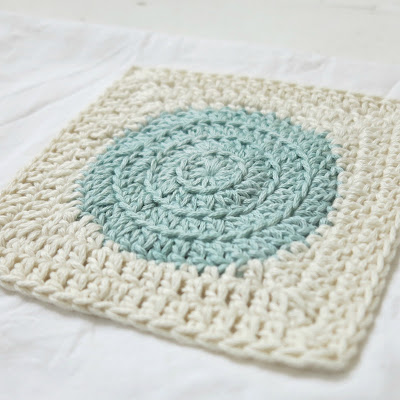
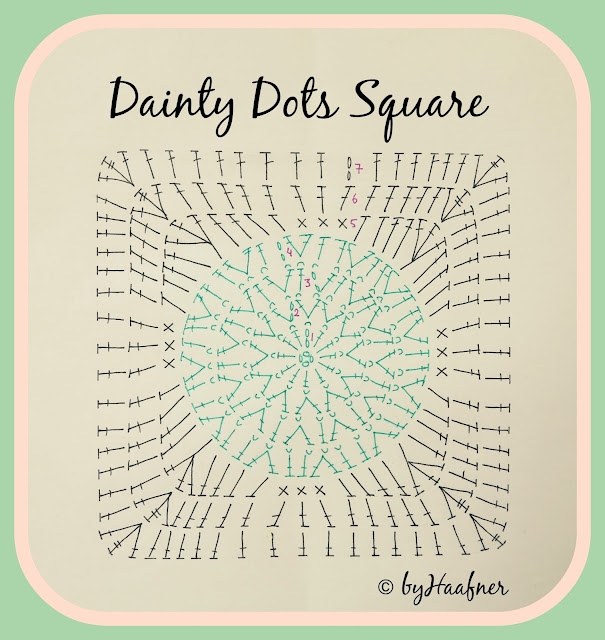
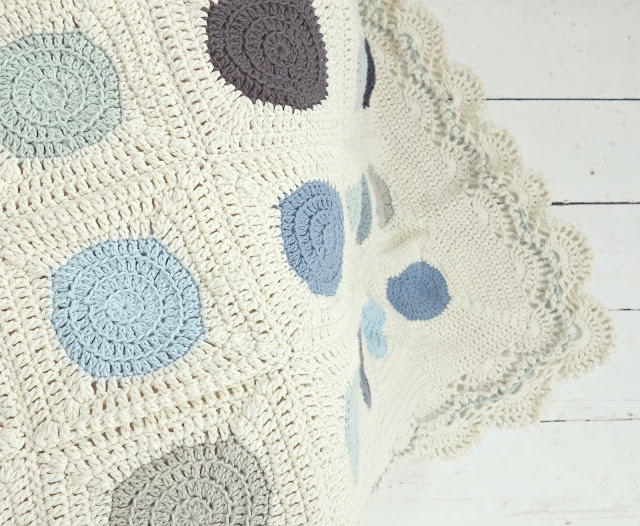
First of all, THANK you for the kind words about my Dainty Dots Blanket. It’s lovely to read them all! Secondly, yes, I know, it took me a while to finally post the pattern for the squares… But hey, here it is: written and as a - sliiiightly wonky ;-) - chart! And with good news too, because I found a free online pattern that is very similar to the pattern for this border.
When I started to work on this blanket I took a fair amount of time to work out a pattern for circle-turned-into-a-solid-square. I wanted the circle stay round, but in most patterns the circles becomes square-ish when turned into a solid square. That’s because you’ll most often have to work three corner stitches in one stitch of the circle, giving the circle a bit of a corner. The problem is less visible when you’re making a square with chain stitches in the corner. Okay, I hope I didn’t loose you at this point? ;-)
So that’s my little trick. I was actually quite excited about it. :-) As I mentioned in my previous post, this particular blanket is so darn heavy the effect is a bit lessened. This has also to do with the fact that the white yarn is thicker and heavier than the blue and grey yarns used for the circles.
And now for the disclaimer... I am sure other crocheters might have come up with the same solution before me. Because once I thought of it, it seemed a pretty obvious thing to do, but I haven’t seen it before.
Pattern Dainty Dots Square
Remarks beforehand
♦ You can either start a new round by chaining 2 (as one substitute dc) or – my favourite – by making a standing double crochet. With the latter you really can’t tell afterwards where you started the round. If you google it, you’ll find that there are several great tutorials online for this technique.♦ The pattern calls for a join at the end of each round. My preferred method is to make a seamless join using a darning needle. (Again, you’ll find great tutorials for this online.) Alternatively you can make a slipstitch in the first st of the round.
♦ BLdc is a BackLoop double crochet: a regular dc, but worked in the backloop only.
♦ I used a brandless Thai cotton for the circles and Rico Creative Cotton for the square part and border. If I would have to recommend a yarn though: I think this pattern would work wonderful in the organic cotton yarn Vinnis Nikkim. If I would make another one, it would probably be my choice because I expect it to give the blanket a wonderful drape. (I used it for the mini-tutorial.)
♦ I used a 4 mm crochet hook, but you can basically use any hooksize that matches your choice of yarn. My motifs measure appr. 15 x 15 cm (6 x 6 inch) each,
Chart
Please don't copy or share or pin the chart elsewhere, but link to this page instead - thank you for linking with love!
Written pattern
To start
Magic circle, or, chain 4 and close with a slipstitch
Round 1
12 dc in ring, join
Round 2
2 BLdc in each dc (24 BLdc in total), join
Round 3
*1 BLdc, 2 BLdc*, repeat between * * along round (36 BLdc in total), join
Round 4
*1 BLdc, 1 BLdc, 2 BLdc*, repeat between * * along round (48 BLdc in total), join
Round 5
This is the round where the circle is worked into a square.
Change to second colour here.
You can start this round in any stitch.
*1 sc, 1 sc, 1 sc, 1 hdc, 1 hdc, 1 dc, 1 dc. Then make a corner: 1 dc, 1 dc made in the dc you’ve just made in the same round (so do not work this stitch in the previous round), 1 dc in first corner dc (so the 2nd and 3rd dc are both made in the 1st corner stitch). Then continue: 1 dc, 1 dc, 1 hdc, 1 hdc*, repeat between * * 3 times, join
Round 6
In this round the corners is made as follows: 1 dc, 1 tr, 1 dc. The treble ensures a sharp corner. If you like a more rounded corner, work a dc instead of a tr.
*1 dc in 13 consecutive stitches, in nxt st: 1 dc, 1 tr, 1 dc (corner made)*, repeat between * * 3 times, join
Round 7
* 1 dc in 15 consecutive stitches, in nxt st: 1 dc, 1 tr, 1 dc (corner made)*, repeat between * * 3 times, join.
Weave in ends.
Joining
Of course you can choose your preferred method. I joined the motifs by single crocheting them together, right sides facing eachother, through both (front and back) loops of both squares.
Border
Okay, as I explained in my previous post I based the lacy part of the border loosely on a Japanese pattern. BUT, I’m happy to say that since then I discovered a VERY similar, free pattern on MyPicot.com. (A great source for all kinds of lovely patterns by the way.) Click here for the link. Although it’s actually for a blanket, you could fairly easily adapt the pattern as a border by just crocheting two lacy segments.
Before I crocheted the lacy segments of the border I made the solid part: five simple rounds of double crochet, with 3 dc in de corner stitch. Of course you could omit the solid part, but personally I always think it gives a clean look.
And then... Your blanket is ready!
So dear people, that’s it. I hope you like it. If you’re making a #daintydotsblanket yourself I’d LOVE to see it! Also, do comment below if something is not clear. I really try to respond asap, but life is rather hectic so I apologize in advance if it takes a while...
Many thanks for your lovely visit. Wishing you a happy day!


Haafner, your dots are quite wonderful...you've definitely found a way to preserve the circular shape while transforming the edge into a square. Bravo! The entire blanket is lovely with that gentle blue and while colorway.
ReplyDeleteThanks so much for sharing the pattern. xo
Oh Frances, that is so kind of you. Thank you very much...
DeleteWishing you a lovely day!
xhaafner
Your blanket is gorgeous, thank you for sharing the pattern. Hx
ReplyDeleteMy pleasure! Thank you for your kind words!
Deletexhaafner
Love your gorgeous blanket and the lacy border! Thank you for sharing. I'm adding it to my to do list.
ReplyDeleteOh, wow, thanks for your sweet words - much appreciated!
DeleteBest wishes, Haafner
The dot square is flawless, the circle never lost its shape. Thank you for sharing! Your blanket is dreamy. :-)
ReplyDeleteCool - you've tried it! That's so nice to hear, I'm glad it kept its shape. :-)
DeleteMy pleasure & thanks for your lovely comment.
Happy crocheting,
Haafner
What a beautiful blanket. And thank you for sharing the pattern.
ReplyDeleteMargrit
Hello Margrit,
DeleteThank you for your lovely comment!
Best wishes, Haafner
Beautiful blanket and a great tutorial! I love your style and sense of colour! Thanks for sharing!!
ReplyDeleteBig hug!
Torill :-)
That's so sweet of you!
DeleteThank you so much - I really appreciate it!
xhaafner
How beautiful! Thank you for taking the time to write up and share the pattern. It really is lovely!
ReplyDeleteThank you so much Darlene, that's very kind of you!
DeleteHappy day, Haafner
….. thank you my dear, xxxxxx Ale
ReplyDeleteThanks Alessandra! Have a lovely day!
Deletexh
Great thanks !!!! I try to do the same, in a very long long time
ReplyDeleteYours is wonderfull, congratulations !!!!!
Many thanks for your kind words - what a joy to read!
DeleteBest wishes,
Haafner
Je deken ziet er geweldig uit Haafner! Top of the bill!! Mooie kleuren. De rand die je erlangs hebt gehaakt maakt het helemaal af.
ReplyDeleteAlvast een fijn weekend!
Madelief x
Dank je wel Madelief!
DeleteWat een lieve reactie. Fijne week nog!
xHaafner
lovely, lovely blanket! So fresh! Thanks for writing the pattern. I will be back to look at all your patterns next time I want to make a blanket:)
ReplyDeleteThank you Linda, what a lovely comment! Do let me know if you're making one of the patterns - I'd love to see your blanket!
DeleteHappy day to you,
Haafner
Love the dot concept and the edging on this project is just plain spectacular! Thanks so much...
ReplyDeletehttp://freecrochetpattern.weebly.com
Thank you so much for your kind words! Much appreciated!
DeleteBest wishes,
Haafner
The blanket is gorgeous. Such a clever way to make the corners neat when turning the circle into a square.
ReplyDeleteThank you for kind comment. I have to admit I was pretty pleased with that corner solution myself. ;-)
DeleteBest wishes,
Haafner
This is such a nifty trick :) I think it will come in very handy in the future! Love your blanket so much... the scalloped border really sets it off! xx Ruth (@ruthinthegarden on Instagram)
ReplyDeleteHi Ruth,
DeleteHow nice to meet you here too! ;-)
Thanks for your most lovely comment & a happy day to you,
xhaafner
I love this blanket - it is so neat!
ReplyDeleteThanks Dawn, I'm so happy you like it!
DeleteLovely day to you, Haafner
Oh, thank you for this how to... this really is a gorgeous blanket
ReplyDeleteThis is a gorgeous gorgeous blanket you are very clever to design this and very kind to share the pattern. Thank you xx
ReplyDelete